Install NextCloud on the Desktop

Here are the basic instructions for setting up NextCloud on your PC.

Step 1:
Open Chrome and navigate to https://nc.atkinsgroup.com. If you already know your password, you can enter your e-mail address and the password and move on to Step 5.

Step 2:
If you don’t know your password, click the Forgot Password link, see below. Enter your e-mail address and click Reset Password. You will get an e-mail with instructions on how to reset the password.

Step 3:
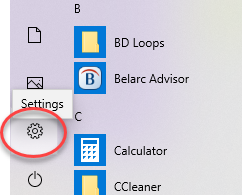
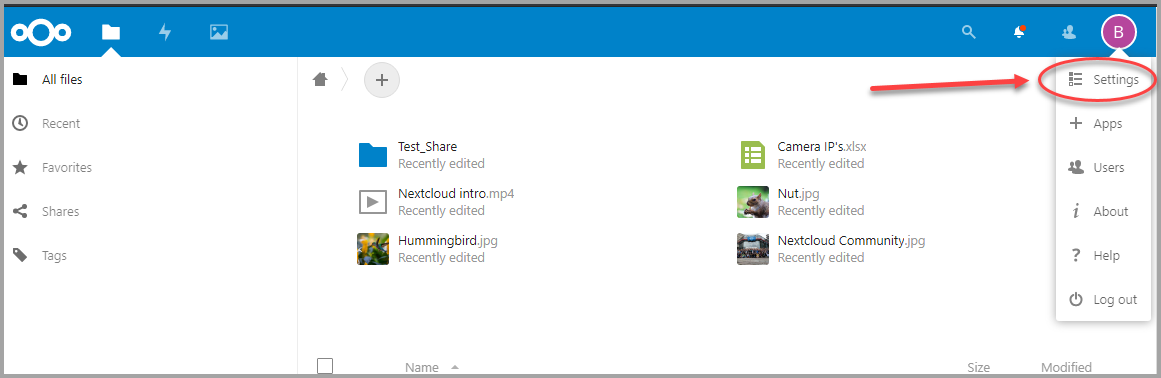
Once your password is reset, log-in to NextCloud https://nc.atkinsgroup.com, On the upper right-hand side of your NextCloud page, you will see your first initial in a circle, As you can see below, mine is a B.
Click the circle with the letter in it, then click the settings link.

Next Click on the  Mobile & Desktop link

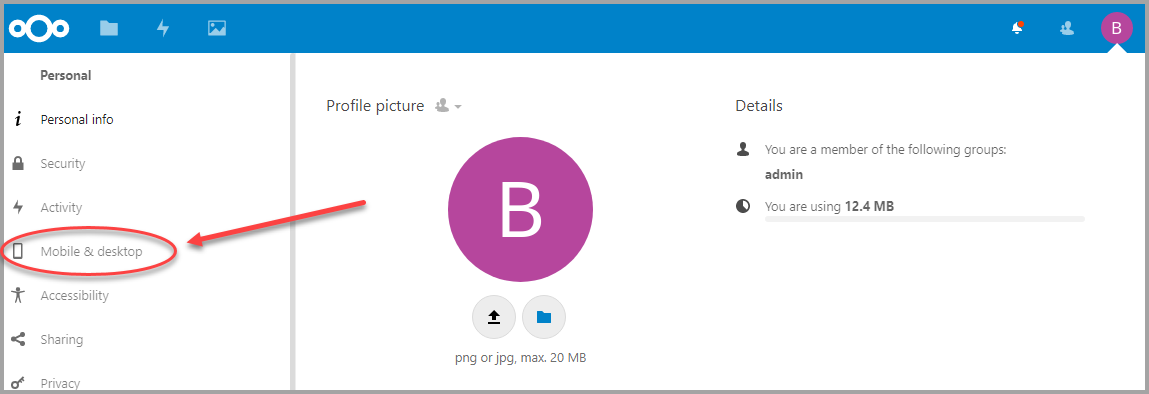
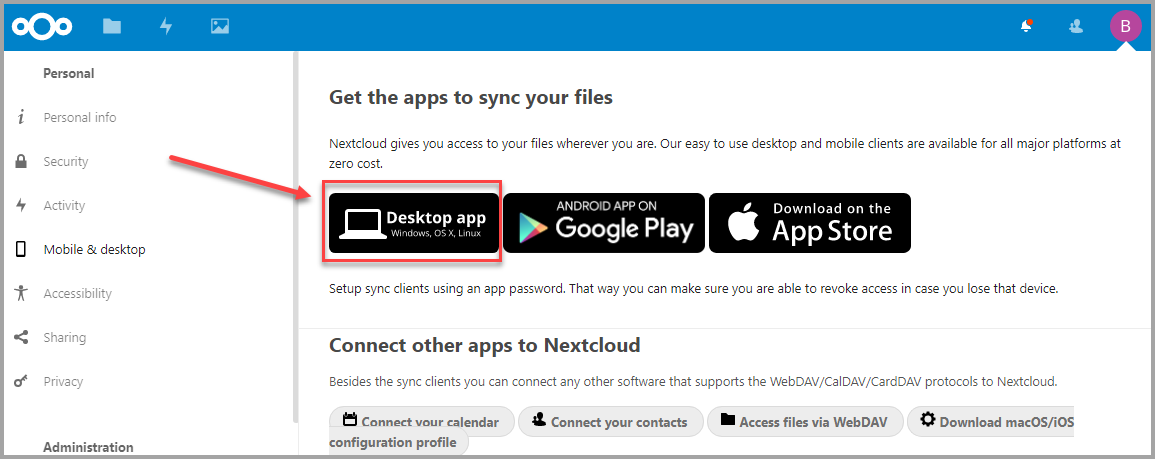
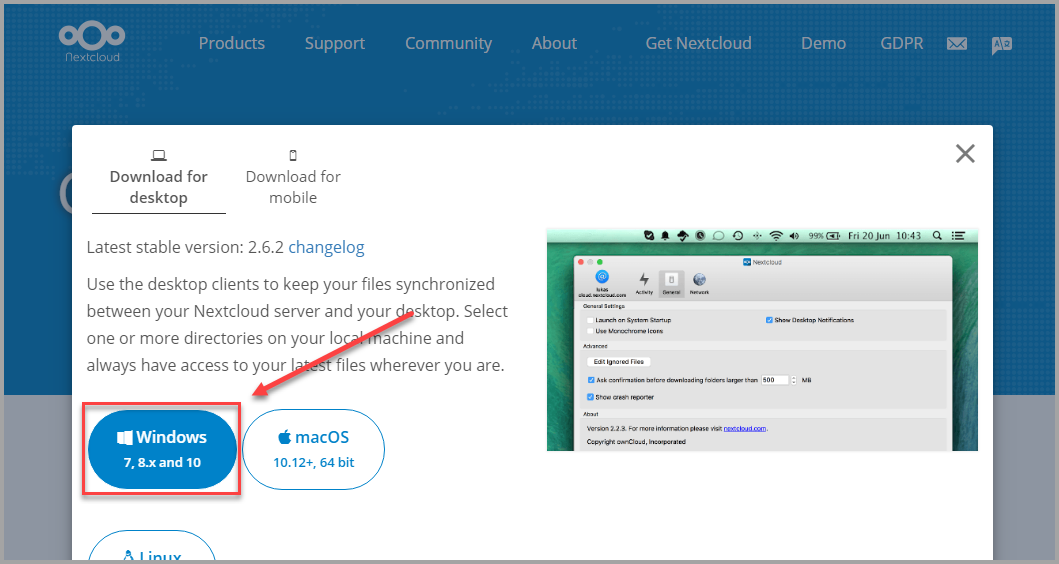
Now you will need to select the Desktop App link

Then the Windows link, this will start the download of the software that you want to install

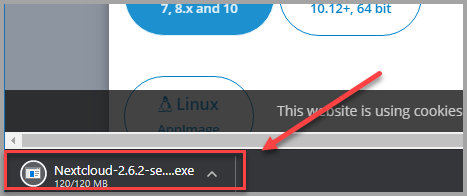
Click the download at the bottom of the window once it is done downloading.

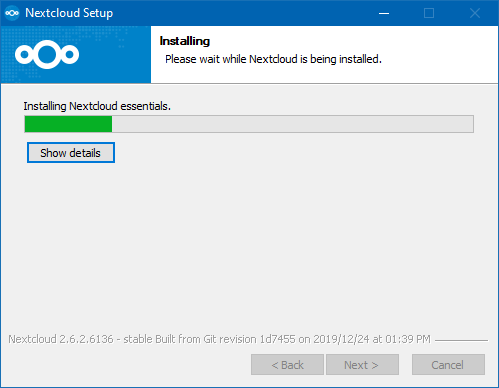
Finally we are starting the installation of the software Follow the prompts and do a full installation

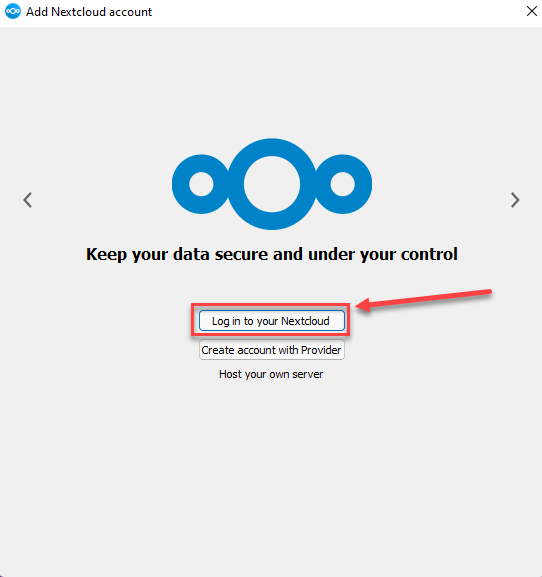
Here is where the tricky part comes in:  After finishing the setup when you click finish you will be asked to Login to your NextCloud. Don’t click the Create account with provider, use the top link.

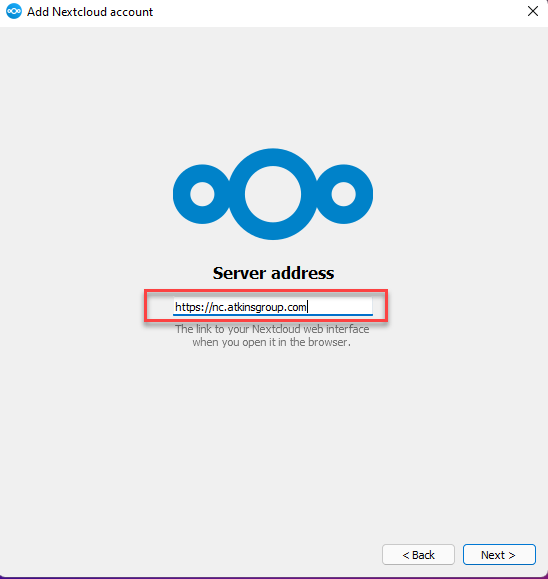
Enter our server address in the field on this next page, https://nc.atkinsgroup.com.

Next the installation is going to connect to your browser to connect NextCloud to your Credentials, so you don’t have to enter them.

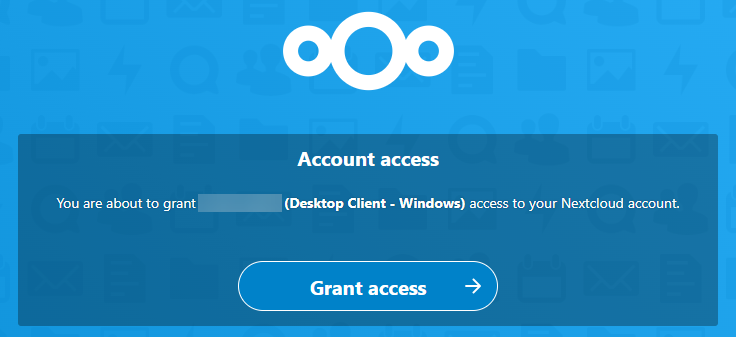
Now we just need to complete the setup by clicking the Connect Button.

This should finish the installation and linking of your account to the App.


Outlook: Original e-mail are saved to drafts after reply or forward

The issue is that when replying to or forwarding e-mail causes Outlook to save a copy of the original e-mail in the Drafts folder…. This one was weird.

To fix it, go into the Options page by clicking on the file tab, then click options near the bottom of that page.

Then choose the Mail link at the left, scroll down until you find the Replies and Forwards section. Uncheck the first item, “Open replies and Forwards in a new Window”

Now, click OK on the way out and you should be good to go.


Outlook prompts to save original e-mail after forward or reply

So, Outlook is asking to save your original e-mail every time you reply or forward.
There is an add-in that causes this issue, it is call the Outlook Social Connector 2016.
Not everyone is seeing an issue with it, so if it isn’t causing an issue, leave it alone.

If you ARE having issues, do the following:

Click the File TAB at the top of Outlook

Then Click Options near the bottom of the page

Now Choose Add-ins, then click the Go button at the bottom of the page

From the Add-ins page, un-check the Outlook Social connector 2016, you may have to scroll down to find it.
Once un-checked, click OK on every page until you are out of the options panel. Close Outlook and then re-open it.

This problem should now be fixed.


Outlook 2019 Auto-Complete

Here are the steps to clear the auto-complete, or alternatively just turn off the auto-complete, completely.

Turning off or clearing Auto-complete:

From within Outlook, click the File TAB. Choose the Options link near the bottom left of the window.

You should now have the Outlook Options window open.

Click the Mail link on the left, and scroll down until you see the Send messages section.

If you want to turn off Auto-complete, uncheck the Use Auto-complete List.

If you just want to clear out what has already been saved, just click the “Empty Auto-Complete List” button, it will prompt you to decide whether you really want to clean the list or not.

If you turn off Auto-complete, remember, you will have to start typing a name then click the “Check Names” button to fill them in.

This will only work for addresses that are in your contact list, or the Global address book. With the Auto-Complete off, Outlook will not remember that you typed in Imaemailaddress@somedomain.com. You will have to type it in every time, or save it to your contacts.

Once saved to your contacts, Outlook will find it by using the “Check Names” button shown below. It’s pretty small, so it can be a pain to find sometimes.

The button is in the Ribbon Bar of new messages.

Editing the Auto-complete list:

You can also delete individual addresses from the Auto-complete list.

In a new e-mail, start typing a name, the Auto-Complete list will pop up. If you see an address you don’t want in the list,

Use the up or down arrow until the address is highlighted, then use the delete button on your keyboard to delete the address.


Sage 300 CRE Print to Excel not working

We were seeing an error when trying to print to Excel from Sage 300 CRE.

The error thrown was:  “Printer not activated. Error Code -30”

This worked for me to fix the problem. I think the issue was created a long time ago, and upgrades didn’t fix the issue.

https://support.na.sage.com/selfservice/viewContent.do?externalId=22320&sliceId=1

I was able to fix it using option A:

Resolution

Reinstall (install) TS PDF Generator:

Option A:

  1. Click your Windows Start Button and select Control Panel.
  2. Select Devices and Printers.
  3. Select the TS PDF Generator printer and remove.
  4. Select any printer listed then click Print server properties from the menu above.
  5. Select the Drivers tab.
  6. Select each instance of the Amyuni Document Converter and click Remove.
  7. Run the PDF Converter install from the following location:
    • Wininst folder on the server …\\Servername\Timberline Office\9.5\Accounting\WinInst\Prerequisites\PDF Converter\RunAmyUnilnst.exe
    • NOTE: The PDF Converter install will run Silently.

If this does not get your TS PDF Generator installed correctly then try the steps outlined in Option B.

Option B:

Use the instructions to completely remove and reinstall the Amyuni PDF driver

  1. Open Devices and Printers (Printers and Faxes on Windows XP), click on the TS PDF Generator and delete it (Remove Device).
  2. Reboot computer (very important step)
    Note: Make sure the TS-PDF printer has been removed, if it’s still listed there may be pending print jobs keeping it installed.
  3. Open C:\Windows\System32\Spool\Drivers\w32x86 and delete all ACpdf*, ACFpdf.txt and Cdintf* files. Delete these files from any sub-directories as well. If the machine is a 64-bit OS, you will also need to search for and delete the same files from the C:\Windows\System32\Spool\Drivers\x64
  4. Delete the amyuni_amyunidocumentconverter* directory if it exists.
  5. Open C:\Windows\System32 and delete all Cdintf* files.
  6. Open C:\Windows\SysWOW64 (if it exists) and delete all Cdintf* files
  7. Open the C:\Program Files\Timberline Office\Shared directory and delete all Cdintf* files.

Install TS PDF Generator Amyuni Driver

FOR ACCOUNTING:

  1. Version 9.8 – navigate to the Wininst folder on the server …\\Servername\Timberline Office\9.5\Accounting\WinInst\Prerequisites\Amyuni\PDFsetup.exe
  2. Version 12.1 – navigate to the Wininst folder on the server …\\Servername\Timberline Office\9.5\Accounting\WinInst\Prerequisites\PDF Converter\LaunchPDFSetup.exe
  3. Version 13.1 and later – navigate to the Wininst folder on the server …\\Servername\Timberline Office\9.5\Accounting\WinInst\Prerequisites\PDF Converter\RunAmyUnilnst.exe

FOR ESTIMATING:

  1. Version 9.8 – navigate to the downloaded install image, to \Prerequisites\Amyuni\PDFsetup.exe
  2. Version 12.1 – navigate to the downloaded install image, to \Install\Prerequisites\PDF Converter\LaunchPDFSetup.exe
  3. Version 13.1 – navigate to the downloaded install image, to \Install\Prerequisites\PDF Converter\PDF Converter\RunAmyUnilnst.exe

After the installation open Devices and Printers, right-click the TS PDF Generator and select Printer Properties. On the Advanced tab, verify that setting are set to:

    • Always Available
    • Priority: 1
    • Driver: Amyuni Document Converter 400 (450 version 13.1)
    • Spool print documents so program finishes printing faster
    • Start printing after last page is spooled
    • Uncheck the box “Enable Advanced Printing Features”
    • On the Security tab, make sure the Everyone group is set to Manage Documents and Manage Printer
    • On the Ports tab, make sure the printer is using the NUL: port
  1. If you are attempting to print to file and the file created is 0 bytes, check to see that the Everyone Group has full control of the Spool folder (C:Windows\System32\Spool).
  2. If your users receive an error code -30 (Printer not activated) after installing, check the following registry key and make sure the Everyone group has full control:

HKEY_LocalMachine\System\CurrentControlSet\Hardware Profiles\Current\Software\TS PDF Generator

  • Right click “TS PDF Generator” and select Properties to verifiy “Everyone” group


Keyboard not working after upgrade from Win7 to Win10

I ran into an issue that I had seen previously but couldn’t remember the solution. After upgrading a users PC to Windows 10 from Windows 7, I could only get me test bench keyboard to work. My thought was that is was a PS/2 through USB adapter that was allowing it to work where other keyboards wouldn’t work.

After searching, uninstalling, bios updates, etc. I found this in the driver details. It sparked a memory of encountering this same problem previously.

I think the problem is caused by GDATA’s keyboard protection not being implemented properly after the upgrade.

To fix the issue, follow the directions below and search for kbdclass in the registry until you find the Upperfilters keys.

Next, remove any mention of GDKBB, it will look like this:

Here is it removed.

Keep searching to make sure there aren’t more entries, I typically find 2 or 3 that need to be changed. When done, reboot and any keyboard should now work.


Set default printer in Windows 10

From time to time I get asked the question: How do I change the Default Printer in Windows.

Here are the steps for Windows 10:

Click on the Windows “Start” icon in the lower left corner of your screen.

Then Click on  the Settings icon:

Choose Devices:

Next Click on Printers and Scanners, then scroll toward the bottom of this page and find “Let windows manage my default printer”, you need to Uncheck this option.

Next find the printer that you want to make the Default Printer, click it and then click the “Manage” button.

You will now see the option “Set as default”, click this button and now this will be your default printer. Once the default is set, close out of all the settings screens and your programs will now use this default printer.


Linux Delete files older than X

Command Syntax

find /path/to/files* -mtime +5 -exec rm {} \;

Note that there are spaces between rm, {}, and \;

Explanation

  • The first argument is the path to the files. This can be a path, a directory, or a wildcard as in the example above. I would recommend using the full path, and make sure that you run the command without the exec rm to make sure you are getting the right results.
  • The second argument, -mtime, is used to specify the number of days old that the file is. If you enter +5, it will find files older than 5 days.
  • The third argument, -exec, allows you to pass in a command such as rm. The {} \; at the end is required to end the command.

This should work on Ubuntu, Suse, Redhat, or pretty much any version of linux.

ref: https://www.howtogeek.com/howto/ubuntu/delete-files-older-than-x-days-on-linux/


Excel formulas not working properly

I recently had an issue where a user copied an old Excel Spreadsheet to create a new yearly file.

When the new file was opened and data was entered, they found that the formulas were not updating as expected. I tried re-creating the formulas with no luck. When I googled the problem I found the answer.

I’m not sure why this happened, but Automatic updating of formulas was set to Manual. Here are the steps to re-enable Automatic updating of Formulas. This is based on Excel 2010, but I am sure the setting is available on most version of Excel.

Open the spreadsheet with the problem, the select the Formulas tab at the top.

Then choose Automatic from the Calculation Options button on the far right.

Make sure to save the file as you exit.

I found the solution here:  https://www.ablebits.com/office-addins-blog/2016/02/03/excel-formulas-not-working/#excel-formulas-not-updating

There are other problems solved on this webpage too, so you might take a look.


Setting Default printer properties

… and getting it to stick.

Have you ever tried to set a setting for a printer and then it seems to go back to the way it was after closing the document you were working with? Well, this always seems trip people up.

When you make a change to printer settings inside of a document (Word, Excel, PDF, etc) the settings are only temporary. To make them stay the way you want them, you have to change the setting from the Printer Control Panel found by opening “Devices and Printers” either from the Start Menu program list, or the Control Panel.

Right click the printer where you want to make changes. Choose “Printer properties” about halfway down the list.