Here are the steps to clear the auto-complete, or alternatively just turn off the auto-complete, completely.
Turning off or clearing Auto-complete:
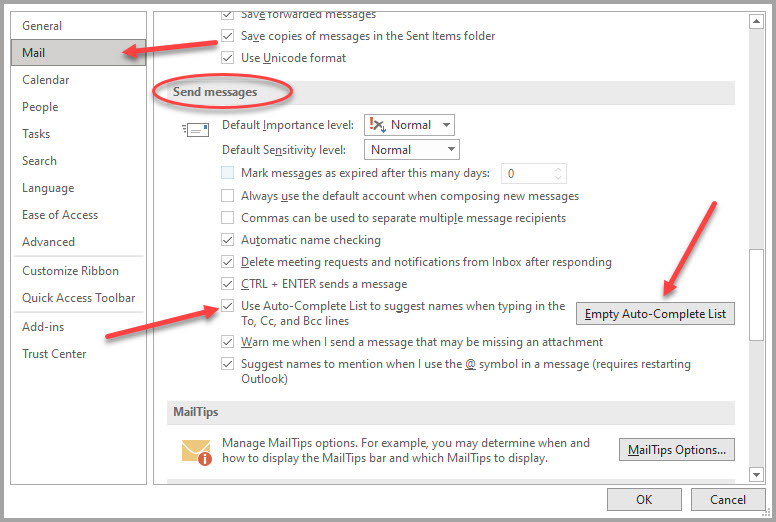
From within Outlook, click the File TAB. Choose the Options link near the bottom left of the window.
You should now have the Outlook Options window open.
Click the Mail link on the left, and scroll down until you see the Send messages section.
If you want to turn off Auto-complete, uncheck the Use Auto-complete List.
If you just want to clear out what has already been saved, just click the “Empty Auto-Complete List” button, it will prompt you to decide whether you really want to clean the list or not.

If you turn off Auto-complete, remember, you will have to start typing a name then click the “Check Names” button to fill them in.
This will only work for addresses that are in your contact list, or the Global address book. With the Auto-Complete off, Outlook will not remember that you typed in Imaemailaddress@somedomain.com. You will have to type it in every time, or save it to your contacts.
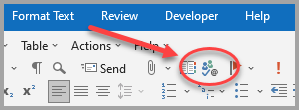
Once saved to your contacts, Outlook will find it by using the “Check Names” button shown below. It’s pretty small, so it can be a pain to find sometimes.
The button is in the Ribbon Bar of new messages.

Editing the Auto-complete list:
You can also delete individual addresses from the Auto-complete list.
In a new e-mail, start typing a name, the Auto-Complete list will pop up. If you see an address you don’t want in the list,

Use the up or down arrow until the address is highlighted, then use the delete button on your keyboard to delete the address.
[acf-media-cluster field_name="post_attachments" container_id="tag-download-attachments" container_class="download-attachments" skin="no" format="list" title="Download Attachments"]